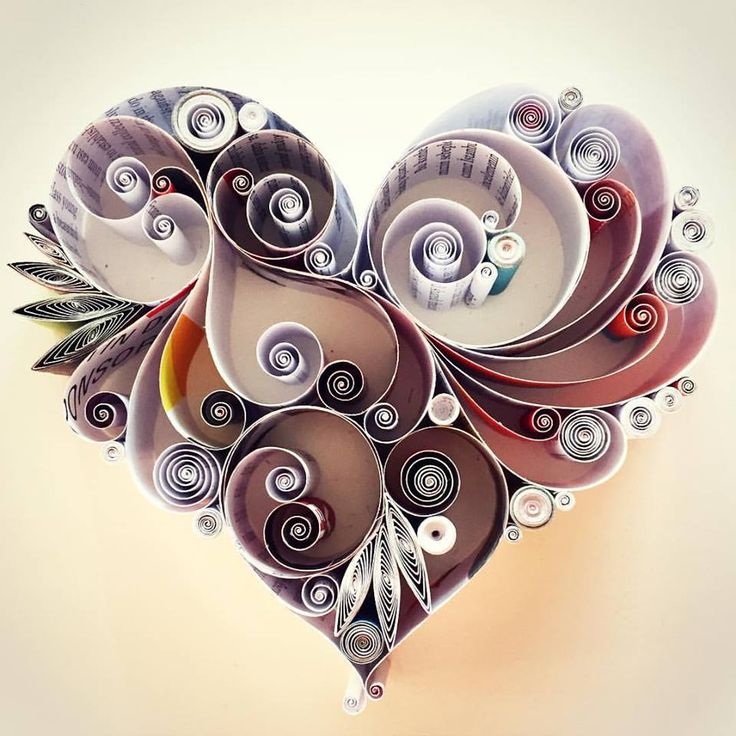
Paper quilling is a wonderful creative outlet. It has been proven that crafting can help with mental wellbeing and it also requires a steady hand and attention to detail, so over time it can improve those skills.
Artist Yulia Brodskaya transforms paper into whimsical creations. She began quilling in 2014 after her cousin introduced her to the craft. She now coils colorful text-weight paper into spirals for animals, flowers, and monograms.
Colors
Paper quilling is often seen on greeting cards, jewelry boxes, and other decorative items. It has recently reclaimed popularity among artists who are using it to create everything from 3D miniatures to abstract art. It is also known as paper filigree, and it has its roots in the metal-based art form of wrought iron.
Originally, it was created by nuns in the 16th century to decorate religious objects. They rolled strips of gilded paper to imitate the intricate patterns of much more expensive wrought iron filigree.
Today, you can find quilling papers in a variety of colors. Some are gilded, some are speckled, and others have two-tone strips that start out dark in the center and lighten toward the ends. You can even find a variety of gradient shades that mimic the shading in Impressionist paintings.
Textures
Using different types of paper and adding textures to your quilling art can add a whole new dimension. For example, crimping can create a wave-like effect, folding can make it look like 3D, and looping can make it seem like your art is floating.
A stencil helps you pre-plan your design and gives you a guideline to follow when curling. You can either use a template from the internet or buy one at a hobby or craft store.
Unlike other forms of art, quilling doesn’t require a lot of supplies to get started. A simple quilling kit includes a few strips of lightweight paper, glue, and a tool to roll the paper with. Even better, you can often use something you already have lying around the house to practice your skills.
Shapes
Paper quilling art is made from coiled and shaped strips of paper that result in a unified decorative design. This craft can be as simple or complex as desired, and it’s a great way to create greeting cards, photo frames, earrings, rakhi, and more.
A wide variety of shapes can be created with this technique, from basic rounded coils to intricate 3D designs. Artists like Yulia Brodskaya use quilling to evoke nature and people, notably with her sculptural portraits of flowers.
It’s possible to create your own unique shapes by rolling and pinching pieces of pre-cut quilling paper, but starting with a pattern or template is a good idea for larger projects. This will help you plan your shapes and ensure that your finished design is symmetrical.
Patterns
Paper quilling requires a steady hand and attention to detail, which can improve hand-eye coordination over time. It can also encourage cognitive skills, such as memory and problem-solving, a benefit that can carry over into other areas of life.
Beginners can start by purchasing or DIY-ing a quilling board to map out their project and keep their work in place while the glue dries. They can then practice making basic shapes like loose circles, teardrops, and triangles.
Once they have mastered those basic shapes, they can move on to more elaborate designs. These can be used to make framed artwork, decorative pieces, or even embellishments for greeting cards. When they’re finished, they can display their creations with pride. The joy comes not just from the final product, but the journey to get there.
Sealing
Paper quilling is a great way to express creativity, and it can also help develop fine motor skills in children. It can also be a relaxing hobby that can relieve stress and anxiety for adults.
It’s important to know how to properly seal your work. A light spray of clear varnish can protect the delicate paper from moisture, and it can add a professional touch to your pieces. It’s important to apply the varnish carefully, as too much can damage your artwork.
It’s best to use a clear varnish with an added UV protection factor, as this will help protect your piece from harmful sunlight. Make sure to wait for your art to dry before displaying it or gifting it. This step will ensure that your masterpiece lasts for as long as possible!

